Search This Blog

Showing posts with label Extras. Show all posts

May 29, 2014

My favorite cookbooks


I love to find recipes and the thrill of the hunt is so fun for me.
I absolutely love to check out a ton of cookbooks from the library and then peruse each one to see if there are any great recipes inside. Once I know that I will really use the cookbook, then I buy it.
So friends....these are the best of the best!

After going through hundreds of cookbooks,
I've narrowed it down to my top favorites.

Here they are {in no particular order}:


2. Perfect Pies & More by Michele Stuart

3. Cake Simple by Christie Matheson

4. Savory Sweet Life by Alice Currah

5. The Pioneer Woman Cooks by Ree Drummond

6. Baking Out Loud by Hedy Goldsmith

7. The Smitten Kitchen Cookbook by Deb Perelman

8. In the Kitchen with David by David Venable


10. Eva's Kitchen by Eva Longoria

11. Picky Palate by Jenny Flake


May 27, 2014

Graduation lollipops


Know someone graduating?
This is the perfect treat!
Here is how to make Graduation Lollipops!


You will need:

mini reese’s cups
Lollipop sticks
Godiva chocolate mini squares
Wax paper
Red licorice or Airheads extreme sour rainbow candy
Mini m&m’s

To Make:
Start with your Miniature Reese’s peanut butter cups. Put the bag of PB cubs in the freezer for a few minutes so that it will be easier to peel off the wrappers without damaging the chocolates.
 Then let them sit for a little while. Place some wax paper on your counter top. One by one dip your lollipop sticks in a bowl of melted chocolate and then gently push them into the peanut butter cups.


Get out your melted chocolate again. With a toothpick, place a tiny dot of melted chocolate in the center of your square and glue down your candy-coated m&m. Then draw a thin line down the side of the square with melted chocolate using your toothpick, and position the “tassel.”
Dip the tops of your PB cup in the melted chocolate and secure the chocolate squares!


Finished product!


Apr 20, 2014

Peenya Kowlada Smoothie


Peenya Kowlada Smoothie
with Strawberries

This is one of the perfect summer smoothies out there! It is delicious, sweet, & can be made lots of different ways!
It originally isn't made with strawberries so when it's mixed, its a creamy light yellow color, but I like strawberries & I like pink....so, i throw some in & wah-la....a delicious light pink smoothie!
Feel free to skip the strawberries, coconut, or anything else & come up with a fun new recipe. But if you want to stick with the recipe for a fabulous drink.....then here you are!

You will need:
12 ounces pineapple juice
1 Tbsp dried, unsweetened coconut
2 scoops pineapple sherbert
1 scoop frozen yogurt
1 scoop (5-6 inch thick frozen) bananas
1 scoop (4-5) strawberries

Oct 1, 2013

Circus Party

If anyone is having a Circus themed party, then here are some ideas from the party I threw my son.
This is the cake that I had ordered.
Various bakeries in town wanted to charge me $100+ for this design, but I found a lady that was willing to do it for a fraction of the price AND she was smart enough to make the top of the cake out of rice krispies, and then just decorated it with fondant.


We had some veggies out and I love the idea of putting the dip right into a red pepper.
I also ordered plastic clear milk jugs and then let the guests fill them up with lemonade!


Here is what the snack table looked like.


Fresh fruit, cupcakes, cookies, popcorn, & peanuts. 


I cut up straws and added marshmallows to the sides to create, 
Strong Man Dumbbells!


Peanuts of course for a circus party!


Popcorn as well!


and that is the decor that I put up. Just twist various colors of streamers and put up some colorful balloons on top!


Jul 24, 2013

Cheesy Baked Artichoke Dip

Cheesy Baked Artichoke Dip


ingredients:

1/2 cup plus 2 tablespoons (packed) grated parmesan cheese (about 2 ounces)
1/4 cup plus 2 tablespoons mayonnaise
1/4 cup plus 2 tablespoons sour cream
1/2 teaspoon ground black pepper
1/2 teaspoon onion salt
1/2 teaspoon garlic powder
pinch of salt
2 14-ounce can artichoke hearts packed in water, well drained, chopped into 1/4-inch pieces
1/4 teaspoon paprika
1 cup italian cheese blend
French-bread baguette slices, toasted

preparation:
Whisk 1/2 cup grated parmesan cheese, mayonnaise, sour cream, pepper, onion salt, and garlic powder in medium bowl to blend. 
Stir in chopped artichoke hearts. Transfer mixture to 3-cup ramekin.I didn't have a ramekin, so i just used a bowl that is oven safe.


Sprinkle dip with remaining 2 tablespoon grated parmesan cheese italian cheese and paprika.


Preheat oven to 375 degrees F. Bake dip until heated through, about 25 minutes (about 35 minutes if chilled).

Preheat broiler. Broil until cheese melts, about 2-3 minutes. 

Serve warm with toasted baguette slices.


Recipe Source: http://www.pickycook.com

Jun 17, 2013

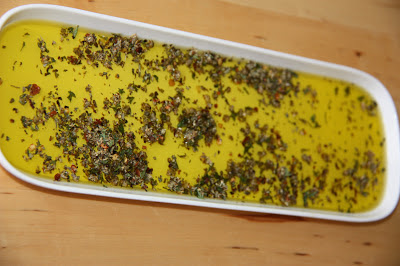
Bread Dipping Oil


I am SUCH a sucker for the yummy, delicious herbs and olive oil restaurants bring out to you with bread. I am also SUCH a fan when it has lots of flavor and enhances the already tasty bread.
I found this recipe and it makes the PERFECT bread dip.
What I like to do is make it up, use a little bit, and toss the rest in a jar and stick it in the fridge.
That way, it is all ready next time I want to have some!


You will need:
1 tablespoon crushed red pepper 
1 tablespoon black pepper 
1 tablespoon dried oregano 
1 tablespoon dried rosemary 
1 tablespoon dried basil 
1 tablespoon dried parsley
1 tablespoon garlic powder 
1 tablespoon fresh minced garlic 
1 teaspoon salt 
extra virgin olive oil 
Bread, any kind you like ( I like french or sourdough)

To Make:


Mix all ingredients together.  
To use, put 1 tablespoon of this seasoning mixture into a small bowl and pour extra virgin olive oil over it.  
Mix and dip warm slices of Italian bread into it!


Store the remaining seasoning mixture in the fridge.

For a printable version of this recipe, click here.


Source: http://www.therecipediva.com

Jun 12, 2013

Angel Food Cake Skewers


This was a super simple dessert that I whipped up one night for an activity.
They are light, super easy to make, and very addicting.

All you need is:
Angel food cake
chocolate ( I used dove individual wrapped ones)
strawberries
wooden skewers
wax paper (optional)

To assemble all you need to do is cut up the angel food cake into small squares and dice up the strawberries in half.
Then get your skewers ready and alternate putting on angel food cake and strawberries.
When that is all finished unwrap as much chocolate as you need,
I think I did like 20 chocolates.
Then place in a microwave safe bowl and slowly let it melt in the microwave.
Constantly check it and stir it.
Do not let it burn.
Then set out some wax paper for when you pour the chocolate on top.

Then when the chocolate is to a desired consistency, drizzle the chocolate over top.
Remember to put the skewers on top of a piece of wax paper.

Then let them cool and let the chocolate harden.
Then after setting, they will be ready to eat!


Source: http://www.burlapandbabies.com

Apr 5, 2013

Flour Tortillas


I've been wanting to make flour tortillas myself for a while now, and I finally did it!
I used them for cilantro lime chicken tacos, recipe here.
They turned out just like my grandmother used to make them, and all you do is add water to this mix.
It is SO easy!

Here is the mix you need, I found it at Walmart.


Then you just add water to the amount you need and create little dough balls.

Then roll each one out, 
make sure you put flour on the surface your working on and also the rolling pin,
and roll, roll, roll!


Place then on a medium-high griddle and cook until each side just barely browns.


I then place mine in a tortilla warmer until right before we eat them!


Feb 3, 2013

Cool tip


I learned this cool tip for a great way to keep those chocolate chip bags with a little bit of chocolate chips still inside.

All you do is get a water bottle or in my case I had my son's juice bottle.
Wash it out completely.
Then cut off the top portion about 2-3 inches below the cap.


Then slip that part over the bag so that the bag goes threw the opening.

and then just slide the chocolate chip bag down and use the lid to screw it on perfectly.
There you go, a super easy way to store excess bags of chocolate chips!


Jan 22, 2013

Cinnamon Honey Butter


Ever been to Texas Roadhouse?
They have some delicious rolls and they serve them with a little cup of this wonderful stuff called Cinnamon Honey Butter.
Well, I found the recipe and decided to try it.

It was SOOOOOO good, that I ended up making them for friends over the holidays.
It is so easy to make and a great gift!

You will need:
1 stick unsalted butter, room temperature
1/4 cup powdered sugar
1/4 cup honey
1 tsp ground cinnamon

To make:
Whip the room temperature butter with a whisk attachment for 30 seconds.
Add powdered sugar, honey, and cinnamon and beat until completely combined and very smooth.
Scrape down sides of bowl and turn up speed and whip for a minute or two until really light and fluffy. 

Makes about 3/4 cup.


I got little mason jars and stickers and made some great gifts!


You can get any type of container you like!


Nov 2, 2012

Cook Bacon in the Oven!

Earlier this year I learned another way to cook bacon, and boy did I need it because every time I cook bacon I always burn it....and then the house fills with smoke....seriously, every time.
So this is my new go to!


Cook bacon in the oven!


Cover cookie sheet with foil first.

You can either do 375 degrees for about 20 minutes or
 400 degrees for 10 minutes, 
but I prefer the longer time because more of the fat renders out. 

Then all the bacon is done at the same time, meanwhile you were free to make the rest of breakfast! 

If you really want to save time, cook them til they're almost done and then, drain them and pop them in a ziploc bag and store in the freezer.

 When you want a bite take how ever many pieces out and put them in the microwave for 30 seconds.

Source: Martha Stewart

Oct 28, 2012

Steakhouse Potatoes

I found this recipe this summer and let me tell you that I can no longer make baked potatoes any other way!
I am seriously addicted to these!
You can add all sort of yumminess on top of them too!
I think I've already made these about 10 times in the span of 3 months!


Steakhouse Potatoes
To start off, preheat your oven to 375 degrees F.
Scrub the potatoes under running water to remove all the dirt.
Pat the potatoes dry with a paper towel.
Using a fork, carefully pierce the potatoes two to three times per side.
Brush the whole potato with olive oil. This will make the skins nice and crispy.
Sprinkle the tops with some sea salt.


Place them directly on the middle rack of the oven. 
I like to place a foil lined baking sheet underneath just in case anything drips off of the potatoes.
Bake for 45-60 minutes or until a fork is able to pierce the potato with little resistance.
Remove from the oven and let cool for 5-10 minutes.
Run a knife lengthwise across the salted top, leaving about 1/2 inch on both sides.
Using both hands, pinch each side of the potato.
While pinching, push towards the center of the potato, forcing it to open up.
Keep pushing and squeeze the fluffy insides up. It might take one or two tries, but it will look like one fancy potato once you master this technique!


Source: Iwashyoudry.com